This year, I thought it would be fun to get the kids in on the festive creative action, and that’s how I discovered… Salt dough!
I’m pretty sure this is not a new concept, but this was my first introduction, and I’m pretty excited about it. Oh, the possibilities! Of course, the kids loved it, too.
And I loved watching the kids take full creative ownership of their work (with just a little helping hand from mom when requested).
This is an excellent guide to making salt dough ornaments, it had all the info I needed: https://www.yummytoddlerfood.com/the-best-salt-dough-ornaments/
Originally, I wanted to try making handprint ornaments for our immediate family, but they were a bit tricky to do. Honestly, the kids weren’t that into it, anyway — they’re little artists with big visions, and they wanted to make their own creations using cookie cutters to make Christmas shapes.
They had a blast (and were shockingly good at rolling dough and cutting out shapes)!
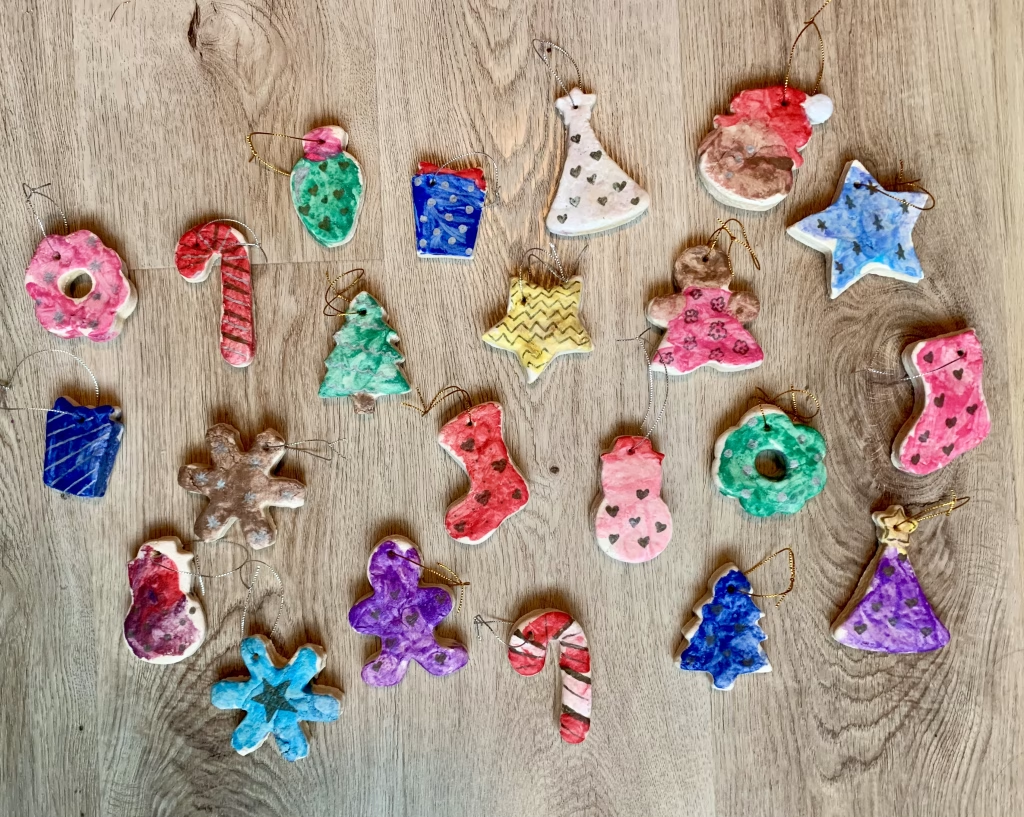
One of the things I like most about making salt dough ornaments is that you can be approximate. We just mixed the dough ingredients in until they felt right. We probably rolled them too thick, and we probably didn’t bake them quite long enough, but it seems like they still turned out great.
As the guide suggests, acrylic paints would probably work the best on the salt dough, but I was far more comfortable letting my 3- and 5-year-olds go to town with tempera paints. The colours didn’t necessarily pack a punch, but they still added a little pizazz to the basic dough shapes.
At their artistic direction, I did go in after with some metallic Sharpies to make little embellishments for them, which also gave them some added character.
Tip: If you’re making holes for string, be sure you’ve gone all the way through with a skewer so that the hole doesn’t taper into a tiny space on the back end!
To finish them off, I gave each side a coat of matte Mod Podge, which was one of the recommendations in the guide. I had no idea Mod Podge existed, but I was delighted to learn about it. Again I say: oh, the possibilities!
As an aside, my little bottle of Mod Podge has puzzle pieces on the label — it turns out one popular use for it is to glue (seal? finish?) completed puzzles together so that you can hang them! I’ve become a huge puzzler this year, but I don’t actually preserve them — I complete one, let it hang out for a day or two, take a photo, and then pack it away again. The joy is in the making, after all! (And I’m leaving the door open for some puzzle swaps in the future.)
If you have any other creative uses for Mod Podge, let me know!
It was wonderful watching the kids bring their ideas to life with confidence. There were many steps to making these, and they met each challenge boldly. (Except for the use of Sharpies and Mod Podge — tasks best left to the grown-ups).
I’ll close out with a little note on perfectionism, something I’ve been grappling with considerably in the last quarter of the year: whether it’s puzzles, crafts, or creative projects, the joy is in the making.
When you make with joy, others can feel it — and you can’t put a price on that.
Happy holidays, creative friends! Shine brightly, love boldly, and have a wonderful holiday season.