Bullet journaling starts out simple: flip to the next available page, and start writing.
But as we fill it up with life’s commitments, events, and musings, navigating it in a logical way can feel a bit complicated:
- How do I make sure I don’t miss an open task if I didn’t do it today?
- What if I use up an entire spread for a collection, but I still want to add to it?
- How do I find notes on a topic if they’re scattered throughout my notebook?
Refresher: A “spread” is one or more pages with a specific purpose. A “collection” is a spread used to collect information on a specific topic. More on spreads and collections here: How to Use a Bullet Journal: Key Spreads & Basic Methodology
These are great questions, and honestly, they’re also great cases for using purpose-built notebooks, like planners. But if you love the idea of an all-in-one mindful productivity tool, then you’ll appreciate these staple navigational techniques!
In this post, we’ll answer these questions with a little crash course in how to navigate your bullet journal with migration, scheduling, and threading.
Migration and scheduling
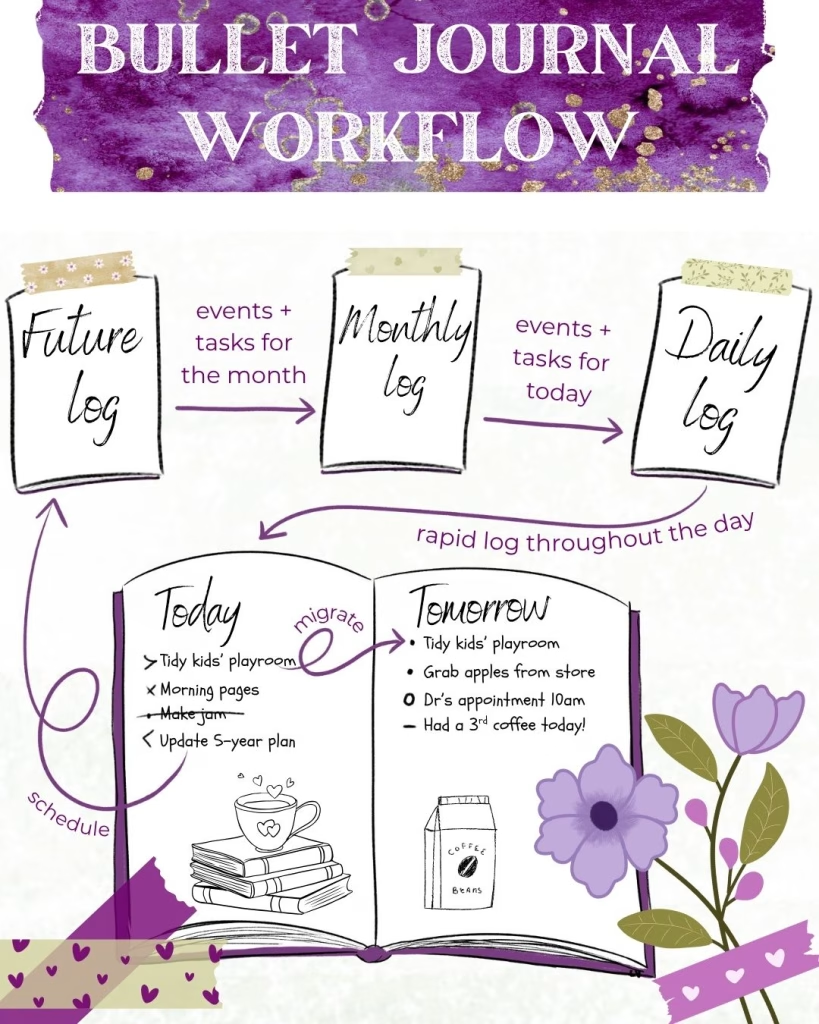
You can ensure that you don’t miss an open task by migrating or scheduling it. This is how tasks move forward in time in your bullet journal:
- Migration is moving a bullet to some time in the near future, by placing it on the next available daily or monthly log, denoted by (>).
- Scheduling is moving a bullet to some time in the more distant future, by placing it on the future log, denoted by (<).
An “open task” (•) is the initial state of a bullet. “Migrated” and “scheduled” are other states. For more on bullet states, check out: Beyond Basic Bullets: Exploring Bullet States
Open tasks won’t linger in the same spot forever; eventually, they’ll be migrated, scheduled, or cancelled. This keeps your journal fluid and functional, without having to flip through the entire notebook to find open tasks.
Migration and scheduling require a bit of reflection. This is where the productivity system doubles as a practice in mindfulness!
Deciding whether to migrate, schedule, or cancel a task
Part of the bullet journaling process involves sitting down to review your open tasks and reflecting:
- Is it really something I need to do, or can I delegate it?
- Will completing this task add value to my life?
- What’s a better day, month, or season to get this done?
- What would happen if I just crossed it out and let it go?
In other words, you’re trying to figure out whether the unfinished tasks are truly worth carrying forward, and if so, to when.
This requires prioritization of all the stuff in your life. Open tasks feel like clutter. To declutter, you need to get clear on what matters most to you.
If it’s not necessary and not adding value to your life, it gets cancelled!
You might also enjoy this Official Bullet Journal take on monthly migration!
When to review your open tasks
When do you flip through and address those open tasks? This depends on your habits and workflow.
In this bullet states post, we talk about three natural points of reflection:
- At the end of each day
- At the end of the week or month
- When a certain number of pages are filled
Officially, Bullet Journal refers to monthly migration.
To make it your own, here are a few things you could consider:
- Would you enjoy more opportunities for reflection by frequently flipping through the last several pages of your journal? -> Monthly
- Do you want to minimize the number of times you have to re-write a task? -> Monthly
- Are you typically planning by week (e.g. weekly meal plans, family schedules, etc.) -> Weekly
- Does your bullet journal start to feel cluttered if your open tasks are scattered about? -> Daily
- Do you find it distracting having to flip back through the pages for relevant tasks? -> Daily, or every time you fill the open pages
- Are your tasks typically project-related? -> At each project milestone
Personally, I review my open tasks when I flip to a new spread. I like to be able to see all open tasks at a glance, and I tend to have very short daily logs (often with at least three days in a single spread). This requires re-writing about twice per week, but it’s a comfortable workflow for me. It also encourages me to get those tasks finished, minimizing the re-writing!
Threading
One of the great things about the bullet journal is that if you want to start writing anything (whether a daily log, a monthly log, or a collection), you just open the next available page and begin.
The problem, particularly for collections, is that you could have pages for that collection scattered all throughout your journal. This happens when I take book notes. I usually read a book over the course of a month or longer, so my book notes are usually only one or two pages at a time, with dailies and other spreads in between.
So how do I go about reviewing an entire collection if it’s in random pages of my bullet journal? The answer is threading!
Threading is a way to link spreads by page numbers for navigation.
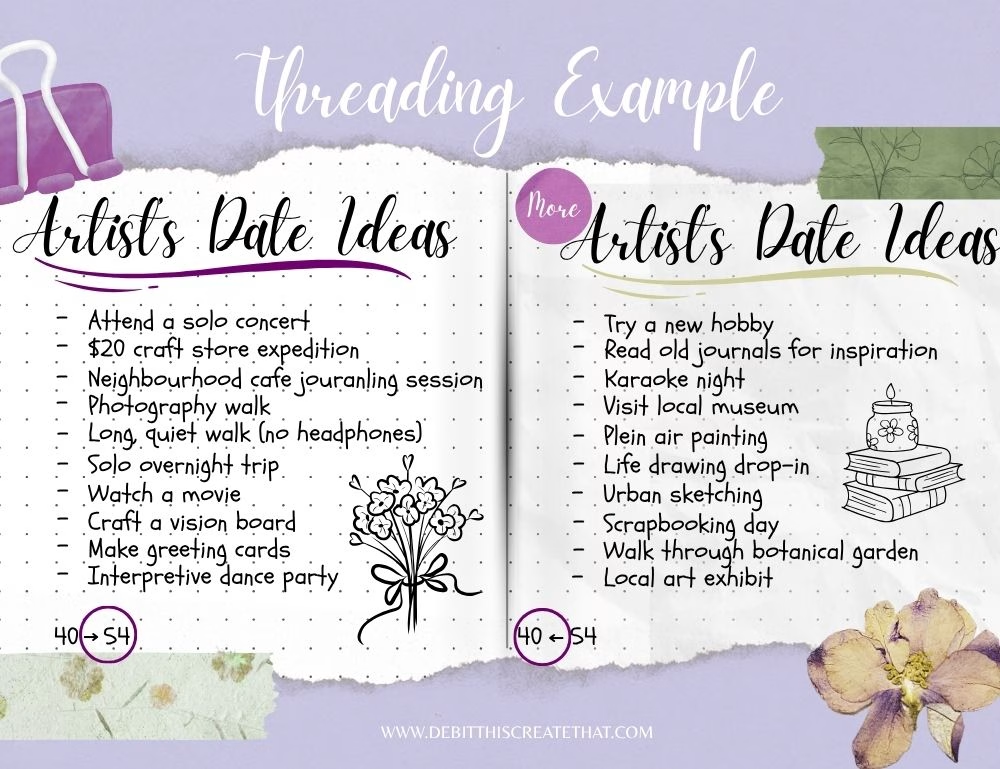
Say I have a collection of artist’s date ideas that takes up page 40 of my notebook. I continued this collection on page 54. Here’s how I would thread the collection together:
- On the most recent page of the collection, next to the existing page number, add: “40 -> 54”. This tells me that the collection continues on page 54.
- On the page that I’m continuing the collection, add: “40 <- 54”. If I’m on page 54, I know the most recent entry prior to this was on page 40.
Threading is one simple system that makes bullet journaling so flexible. You don’t need to guess how many pages you’ll need for a collection, and you certainly don’t need a separate notebook for it!
Another benefit of using threading is that you don’t need to update your index again. In the Artist’s Date Ideas example, my index will include the entry: 40 – Artist’s Date Ideas, indicating the start of this collection. Once I flip there, I’ll be able to navigate all subsequent pages of the collection, thanks to threading.
You could update your index to reflect “40, 54, 108-109, etc. – Artist’s Date Ideas”. I find that the page number references get too crowded in the index if I do this, though.
Navigating your bullet journal: making it all work together
Indexes, page numbers, and spreads, oh my!
If you’re brand new to bullet journaling and this all seems intimidating, here are four tips to bring it all together.
Adding migration, scheduling and threading can feel like more advanced bullet journaling concepts. You don’t need them to make it work for you, but they helped me fill major gaps in my system after I got used to the basics.
1: I don’t have pre-numbered pages. Help!
I balked at the idea of adding page numbers to a truly blank notebook, but I’ve done it and it ended up being totally manageable.
The trick is to fill them in as you go.
When you open your notebook, just write the two page numbers for that spread at the bottom left and right. Then, add it to your index (if relevant). You don’t need page numbers on the pages you aren’t using yet.
2: What do you really add to your index?
I only add things that would be handy to refer back to. For me, that’s nearly everything except weekly and daily logs.
As I mentioned, I don’t add every single page of a particular collection – just the first page. I let threading do the rest.
Sometimes I do long-form journal entries in my BuJo as well – typically those don’t go in the index, unless there was something in there that I know I’ll want to refer back to in the future!
3: Do I really go back and read every single entry to find relevant information?
No! Some things, such as completed tasks and most events, probably don’t need to be reviewed. They’ve passed, and their time of relevance to you has elapsed.
However, my bullet journal is also my creative companion, so I tend to have ideas and hits of inspiration that I want to refer back to.
I make those important tidbits easily identifiable by adding signifiers.
Signifiers help important entries jump out of the page at a glance! Read more about signifiers in this post.
4: I’m tired of flipping pages! Anything else I can do?
Of course! You can add bookmarks.
My favourite notebooks come with two ribbon bookmarks, and I usually leave one on my monthly log and one on my daily log for easy access.
If you have a collection or two that you frequently want to flip back to, you can add bookmarks to those as well. I recommend something that won’t easily fall out of your notebook, such as:
- Post-it notes
- Washi tape folded over the edge of the page
- Colour-coding a bit of the edge with a marker or highlighter
Parting words
Hopefully your system is now coming together, and you’ve got your own little world captured in the pages of your notebook!
It’s true that constraints can inspire creativity, but it’s also true that having a flexible space encourages spontaneity. This takes your bullet journal beyond a productivity system and turns it into a wonderful creative companion.
(>) So, what will you try next? Comment below!
(<) If you’re ready for more beginner bullet journal tips, head back to the guide: The Busy Creative’s Guide to Bullet Journaling (Start Here!)
And of course, for monthly connection, encouragement, and creative tidbits, sign up for the Newsletter and let’s continue to balance the books and the creative life.
Happy journaling!


